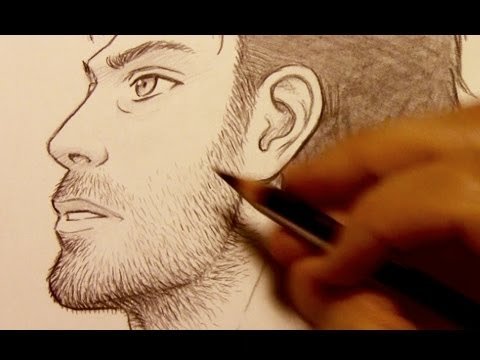
To draw stubble with natural depth and realism, start by using short, quick strokes and varying pressure on your pencil. Focus on creating irregular patterns and leaving subtle spaces between the lines. This technique will help you achieve a textured look that mimics the appearance of stubble growth on the skin. By following these simple steps and practicing regularly, you can enhance your drawing skills and master the art of creating lifelike stubble in your artwork. So, let’s dive in and discover the secrets of how to draw stubble with confidence and precision.

How to Draw Stubble – A Comprehensive Guide
Introduction: What is Stubble?
Stubble refers to the short, coarse facial hair that begins to grow back shortly after shaving. Drawing realistic stubble can add depth and detail to your artwork, whether you’re sketching a portrait or creating a character. In this guide, we will explore various techniques to help you master the art of drawing stubble.
Materials You Will Need
Before we dive into the techniques, let’s gather the necessary materials. You will need:
- Pencil
- Eraser
- Sketch paper
Make sure to have these items handy before you start drawing.
Step 1: Outline the Facial Structure
Start by sketching the basic outline of the face. Pay attention to the shape of the jawline, cheekbones, and chin. This will serve as the foundation for your stubble artwork.
Step 2: Lightly Shade the Area
Using your pencil, lightly shade the area where the stubble will be. Avoid pressing too hard; stubble should appear subtle and natural. This initial shading will help create the illusion of hair growing on the face.
Step 3: Add Individual Stubble Hairs
Now, it’s time to add individual stubble hairs. Using short, quick strokes with your pencil, create tiny hair-like marks on the shaded area. Vary the length and direction of the strokes to mimic the irregular growth pattern of facial hair.
Step 4: Refine and Blend
To enhance the realism of the stubble, refine the individual hair strokes and blend them into the shaded area. Use your eraser to lighten certain areas and create highlights where light would naturally hit the stubble.
Tips for Drawing Realistic Stubble
Here are some additional tips to help you draw realistic stubble:
- Study reference images of stubble to understand the texture and pattern.
- Experiment with different pencil grades to achieve varying degrees of darkness.
- Practice patience and take your time to create detailed stubble.
- Observe how light plays on facial hair and incorporate highlights accordingly.
- Don’t overdo it; subtle stubble can be more effective than heavy, dark stubble.
Congratulations! You have now learned how to draw realistic stubble. Remember, practice makes perfect, so keep honing your skills and experimenting with different techniques. Adding stubble to your artwork can elevate the overall look and bring your characters to life. Have fun drawing!
How to Draw Facial Hair (Razor Stubble)
Frequently Asked Questions
How can I make stubble look realistic in my drawings?
To draw realistic stubble, start by lightly sketching the overall shape of the facial hair using short, quick strokes. Focus on areas like the jawline, upper lip, and chin where stubble usually grows. Use varying line lengths and densities to mimic the uneven nature of stubble growth. Additionally, consider adding subtle shading and highlighting to create depth and texture, making the stubble appear more natural.
What tools are best for drawing stubble?
For drawing stubble, consider using a fine-tip pencil or pen to create precise, small marks that mimic hair follicles. Alternatively, you can use a stippling technique with a small brush or marker to build up the illusion of stubble. Experiment with different tools to find the one that gives you the desired level of detail and texture in your stubble drawings.
How can I add dimension to stubble in my artwork?
To add dimension to stubble in your drawings, vary the length and direction of your strokes to create a sense of depth and texture. Use lighter strokes in areas where the stubble is sparse and darker strokes where it is denser. Consider adding subtle highlights along the edges of the stubble to suggest light reflecting off the hair follicles, enhancing the three-dimensional quality of your artwork.
Final Thoughts
For realistic stubble, use short, quick strokes. Start with light pencil marks and gradually build up density. Vary the direction of your strokes to mimic natural hair growth. Remember, less is often more when it comes to drawing stubble. Practice regularly to master the art of depicting stubble convincingly. How to draw stubble: Light strokes, varied direction, practice. Master the art of realistic stubble with dedication and patience.