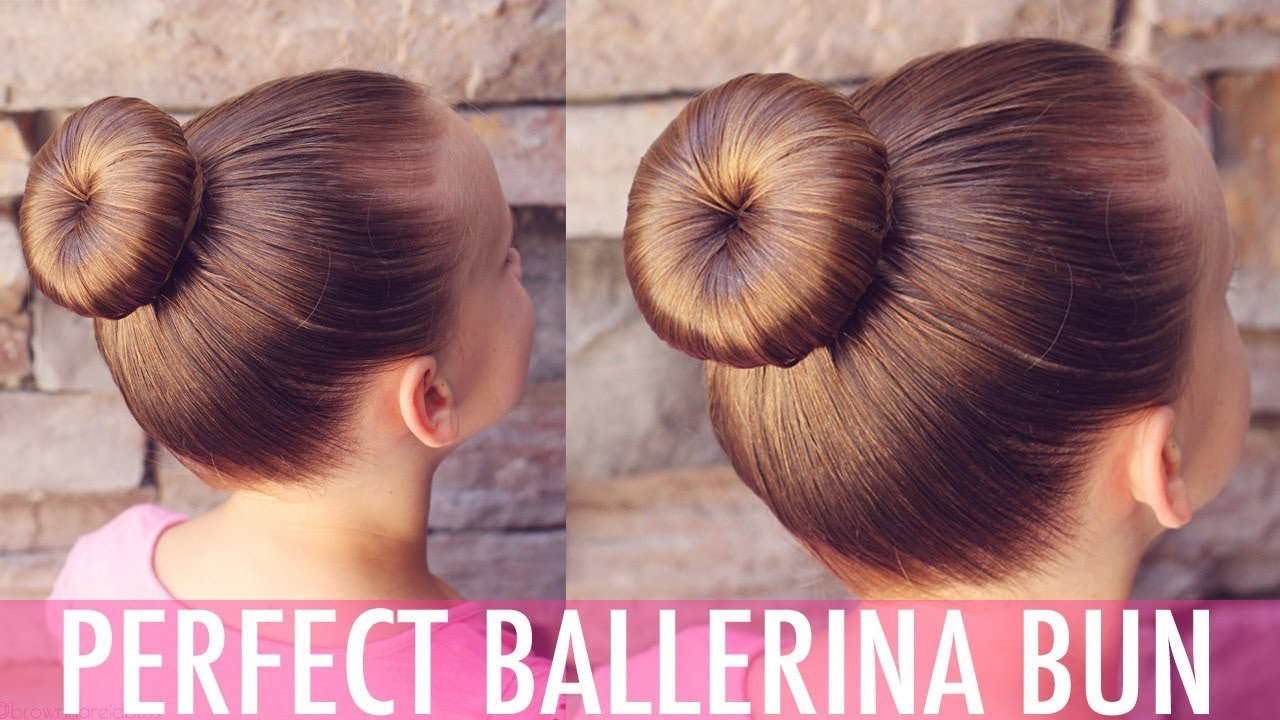
The elegant and timeless ballerina bun – a staple hairstyle for dancers and a go-to look for anyone wanting a sophisticated updo. To achieve the perfect ballerina bun, start by securing hair into a high ponytail and twisting it into a bun shape. Use bobby pins to keep it in place and finish with a spritz of hairspray for hold. Let’s dive into the step-by-step guide on how to do a ballerina bun effortlessly, adding a touch of grace to your everyday style.

How to Do a Ballerina Bun: Step-by-Step Guide for Perfecting Your Hairstyle
Are you ready to learn how to create a classic ballerina bun that looks elegant and polished? Whether you’re getting ready for a dance performance, a special event, or just want a sleek hairstyle for everyday wear, the ballerina bun is a versatile and timeless look that can be achieved with a few simple steps. In this comprehensive guide, we’ll walk you through the process of creating the perfect ballerina bun, from start to finish.
Materials You’ll Need:
Before you begin styling your ballerina bun, gather the following materials:
1. Hairbrush or Comb:
You’ll need a hairbrush or comb to detangle your hair and smooth out any knots before creating your bun.
2. Hair Tie or Elastic Band:
To secure your bun in place, you’ll need a hair tie or elastic band that matches your hair color.
3. Bobby Pins:
Bobby pins will help secure any loose strands of hair and keep your bun neatly in place.
4. Hair Spray (Optional):
If you want to add extra hold and keep flyaways at bay, you can use a light-hold hairspray.
Now that you have all your materials ready, let’s dive into the step-by-step process of creating a flawless ballerina bun.
Step 1: Start with Clean, Tangle-Free Hair
Before you begin styling your ballerina bun, make sure your hair is clean and free of tangles. Use a hairbrush or comb to gently brush through your hair and remove any knots or snarls. This will ensure that your bun looks smooth and polished once it’s styled.
Step 2: Gather Your Hair into a High Ponytail
Next, gather all your hair at the crown of your head and secure it in a high ponytail using a hair tie or elastic band. Make sure the ponytail sits right at the top of your head to create that classic ballerina bun look.
Step 3: Twist and Wrap Your Ponytail
Take your ponytail and twist it around itself to create a tight coil. Continue twisting until the entire length of your ponytail is wrapped around the base to form a bun shape. Make sure the bun is secure and snug against your head.
Step 4: Secure the Bun with Bobby Pins
Once you’ve twisted your ponytail into a bun shape, use bobby pins to secure the bun in place. Insert the pins around the base of the bun to anchor it to your head and prevent it from coming loose. If you have any loose strands, tuck them into the bun and secure them with additional bobby pins.
Step 5: Finishing Touches
To complete your ballerina bun look, you can spritz some hairspray over the bun to add extra hold and tame any flyaways. You can also gently tug on the edges of the bun to create a fuller, more voluminous look. Once you’re satisfied with the shape and hold of your bun, you’re all set to showcase your elegant hairstyle!
Tips for Perfecting Your Ballerina Bun:
– For a sleek and polished look, use a fine-tooth comb to smooth out any bumps or lumps in your bun.
– If you have layers or shorter pieces of hair that won’t stay in the bun, you can use bobby pins to secure them in place.
– To add an extra touch of glamour, you can accessorize your ballerina bun with a decorative hair clip or headband.
– Practice makes perfect! Don’t be discouraged if your first attempt at a ballerina bun isn’t flawless – with a little practice, you’ll be able to create a perfect bun in no time.
The ballerina bun is a versatile and elegant hairstyle that can be worn for any occasion, from dance performances to formal events to everyday wear. By following the simple steps outlined in this guide and practicing your technique, you’ll soon be able to master the art of creating a perfect ballerina bun every time. So go ahead, gather your materials, and get ready to showcase your impeccable style with a beautiful ballerina bun!
Perfecting a Perfect Ballerina Bun | Brown Haired Bliss
Frequently Asked Questions
How do I create the perfect ballerina bun?
To create a ballerina bun, start by combing your hair into a high ponytail and securing it with a hair tie. Twist the ponytail and wrap it around the base, securing with bobby pins. Smooth out any bumps and hairspray for a polished look.
What type of hair is ideal for a ballerina bun?
Most hair types can be styled into a ballerina bun. However, longer hair that is straight or slightly wavy tends to work best as it allows for a neat and sleek bun. You can also use hair extensions or a bun maker for added volume.
Can I add accessories to enhance my ballerina bun?
Absolutely! You can elevate your ballerina bun by adding accessories like decorative pins, ribbons, or a sparkly hair clip. These accessories can add a touch of elegance or playfulness to your bun, depending on the occasion.
Final Thoughts
To create the perfect ballerina bun, start by gathering your hair into a high ponytail. Twist the ponytail and wrap it around the base, securing with bobby pins. Smooth out any flyaways and finish with hairspray. Remember, the key to a flawless ballerina bun lies in the technique of twisting and pinning. Master the art of how to do a ballerina bun for an elegant and classic look that is perfect for any occasion.